
IBM Fix Page
The Guardium 10 brings to us a lot of new fantastic features but the development team also improved existing functionalities. One of them is GIM.
Important: Starting with version 10 all STAP binaries are available on IBM Fix Page, the Passport Advantage customer site does not include these files. However the GIM and CAS installers are still available on PA.
GIM (Guardium Installer Manager) allows to manage all Guardium services from one place including installation, update, reconfiguration and removal. The heterogeneous and complex data access monitoring can be managed easily with GIM, that is why I always suggest my customers to use it even they are starting from one collector or do not plan to aggregate data or use the central manager.
Current version of GIM provides two types of installation – standard and listener mode. First one is known from previous version and assumes that the operating system administrator has all information to define communication between GIM and Guardium appliance and also the appliance is accessible during installation. However in the complex Guardium implementations with dozens collectors, aggregators and central manager and hundreds STAP the configuration of network topology and communication rules on firewalls and vlans requires time and synchronization of activities many different customer IT teams. In order to accelerate and facilitate this process we can install GIM in the listener mode. In this mode GIM process starts on managed system and looks forward to the initial communication from appliance. It simplifies the installation process and minimizes the work effort of IT system operating team. Later Guardium administrator will able register GIM to appropriate collector or central manager.
Another very important feature is related to security of GIM and appliance communication. Actually we can specify our own SSL certificates and provide anti-spoofing protection using the shared secret phrase.
Communication between GIM agent and appliance
- all data transfer channels use SSL
- port 8444 is used to secured and unauthenticated communication
- port 8446 is used to secured and authenticated communication
- standard mode of installation based on default appliance certificates is always registered on port 8446 – it does not allow for identification of unauthorized attempts the GIM agent registration on appliance (it suggests use non-default SSL certificates)
- If SSL handshake based on non-default certificates fails communication is switched to port 8444
- port 8445 is used by GIM agent in the listener mode only, if the GIM agent is successfully associated with the appliance the GIM switches to port 8446
Standard server GIM installation
- Download the GIM installation package (Guardium_10.0_GIM_Windows.zip) and unpack it.
- The GIM installer is inside the Windows_GimClient_r79461_Installer.zip archive. Copy and unpack it on the managed system.
- Run the installer – setup.exe (installation of GIM service requires administration privileges on the managed system.
- Click Next and provide the User Name and Company Name in the “Customer Information” window
- Next installation screen provides possibility to define non-default installation path for GIM binaries (Custom). Default path is
“c:\Program Files (x86)\Guardium\Guardium Installation Manager“ - Start first stage of installation – Install button.
- Installation package contains bundled Perl distribution which will be installed but you can point the other one which will be used to run GIM process in case of Perl standardization in your company.
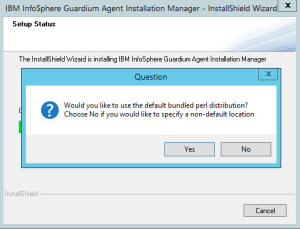
Selection of Perl distribution
- Select “Standard Mode” of installation.
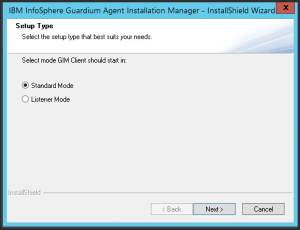
Installation type
- Insert appliance IP address or host name.
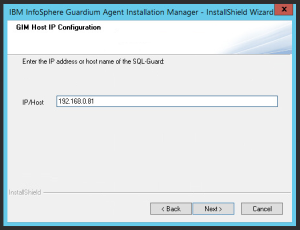
Appliance location
- Point the IP address of the local network interface with access to the appliance.
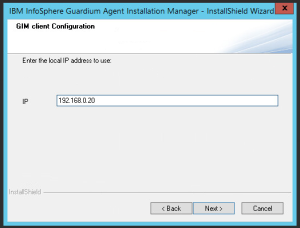
Local IP address
- Click Finish button.
- Check GIM communication on appliance (Manage->Module Installation->Monitor GIM Processes)
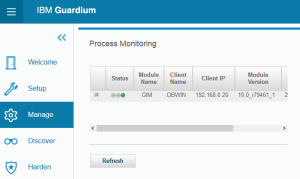
GIM agent status
- Check “GIM events” – this report is not available in the standard menu. Add it to your dashboard:
- Create New Dasboard (My Dashboards->Create New Dasboard)
- Click the “Add Report” button and add “GIM Event List” and “Unauthenticated GIM Clients” reports to your dashboard
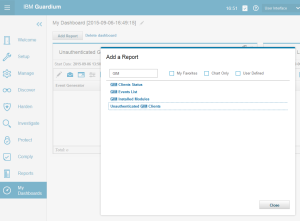
GIM reports
- If both reports are empty it means that your GIM installation works properly.
- Check the installation status in the file:
c:\guardiumStapLog.txt - Check the GIM log:
<GIM_HOME>\GIM\current\GIM.log


Standard installation with own SSL certificates
The SSL configuration for GIM uses this same certificates on GIM and appliance. It leads to some limitations:
- we can use only one certificate for GIM appliance and all agents which communicates with it
- if you plan manage GIM from Central Manager it means that all GIM agents will use this same certificate
- certificate replacement on production will require reconfiguration all GIM agents
- the GIM failover appliance has to share this same certificate with primary appliance
TASK1: CERTIFICATE GENERATION
Prepare certificate for your GIM domain. You need 3 files in PEM format:
- Certificate of your CA
- Private key of your GIM domain certificate
- Certificate of your GIM domain signed by your CA
TASK 2: Certificate INSTALLATION on Appliance
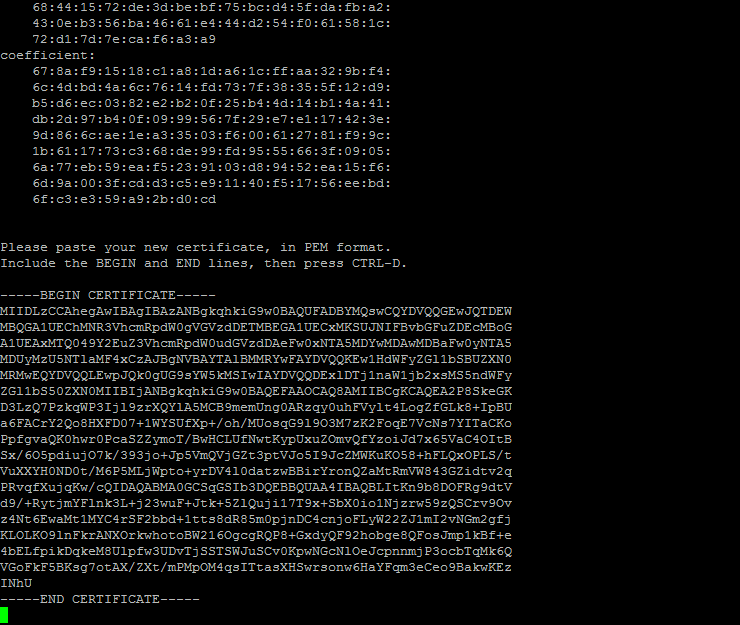
Login to cli account and configure GIM certificates:
store certificate gim console
This command requires paste into the private key, GIM domain certtificate and CA certificate:


Important: You can restore default GIM certificates
restore certificate gim default
TASK 3: GIM Agent installation
Copy your certificate files on managed system (c:\certificates directory in my case).
Then execute GIM installer from command line using this syntax:
setup.exe /s /z" --host=<appliance_ip> --path=<c:\\GIM_HOME> --localip=<managed_system_ip> --ca_file=<full_path_to_ca_certificate> --cert_file=<full_path_to_GIM_domain_certificate> --key_file=<full_path_to_key_of_your_GIM_domain_certificate>"
This command starts silent installation. After a while the GIM agent should be installed. Confirm status of the installation in the logs and reports.

Silent installation
SSL RECONFIGURATION
If the SSL certificate used by GIM agent will not correspond with SSL certificate stored on the appliance we will notice appropriate message in the status bar:

Unathenticated GIM client
Also, “GIM Events List” and “Unathenticated GIM Clients” reports will include information about this situation:

GIM Reports
To restore authenticated communication between GIM and the appliance we must upgrade certificates on the appliance or indicate correct files in the GIM parameters.
To upgrade GIM parameters go to “Manage->Module Installation->Setup by Client” and click on Search button

GIM client selection
Select appropriate GIM client and push Next. To see GIM module we have to unselect “Display Only Bundles” option. Now we can select GIM and click on Next.

Module selection
In the “Common Module Parameters” section point the required files and then select your GIM agent under “Client Module Parameters” and click on Apply to Selected.

Parameters assignment
Finally push Apply to Clients and Install/Update buttons and order update immediately in the pop-up window.

Update schedule
Check the update status – open “Installation Status” window (small “i” icon in GIM agent row inside “Client Module Parameters“) and review status, press Refresh button until disappears information about update.

Update status
Now return to the GIM reports and notice that unauthenticated GIM clients list is empty and the newest GIM event from this agent confirms accurate configuration.

GIM reports
Installation in listener mode
This type of installation not only allows to speed up GIM installation process, but also provides the safe transfer of administrative tasks from operating system administrators to the Guardium administrators team.
TASK 1: SSL CONFIGURATION
If you would like to use own SSL configuration please prepare certificates as described in the previous section and install them on appliance. Copy them also on managed system.
TASK 2: INSTALL GIM AGENT IN LISTENER MODE
Execute setup.exe and select “Listener Mode” this time.

Listener mode selection
Insert IP address of local network interface and then point the certificate files. If you put something wrong the installer will describe this problem.

Certificates location
Accept the default port used by listener (8445) or point another. In the next window specify the shared secret (on production this phrase will be defined by system administrator).

Shared secret specification
Finish the agent installation and check logs and confirm the status of “IBM Security Guardium Installation Manager” inside Windows services.

GIM windows service
Note: In the version 10 the GIM service changed the name from “Guardium Installation Manager” to “IBM Security Guardium Installation Manager
You can also install the GIM agent in the listener moder from the command line:
setup.exe /s /z" --shared_secret=<your_shared_secret> --path=<c:\\GIM_HOME> --localip=<managed_system_ip> --ca_file=<full_path_to_ca_certificate> --cert_file=<full_path_to_GIM_domain_certificate> --key_file=<full_path_to_key_of_your_GIM_domain_certificate>"
TASK 3: GIM Remote ACTIVATION
The GIM agent in the listener mode can be associated only with the appliance which uses correct SSL configuration and shared secret. If the appliance will use incorrect information the GIM agent will reject communication and wait for another activation request.
Go to the activation form in the appliance portal (Manage->Module Installation->GIM Remote Activation). Insert correct information about IP address of GIM agent service, GIM Listener port and shared secret (in this place the system administrator delegates his duties to Guardium team).

GIM agent activation
 Check GIM status in the portal, logs and reports. Your GIM agent should be assigned to the appliance. After the GIM agent assignment the agent is switching to secure and authenticated communication, the shared secret is no longer used.
The GIM Global Parameters (Manage->Module Installation->GIM Global Parameters) allows us to define default shared secret during GIM agent assignment. From my point of view, use this same shared secret for all agents makes sense only when customer does not provide segregation of duties between system and Guardium administrators.
GIM Auto-discovery
For the large implementations Guardium provides a new functionality to discover the GIM agents worked in the listener mode.
Go to Discover->Database Discovery->GIM Auto-discovery Configuration and add a new process (+ icon)

add new GIM discovery process
Provide process name and add the scope of IP addresses for the scan. Each hosts definition has to be confirmed using Add scan button

add hosts to process
Run process – Run Once Now button. Then review results – View Results button. This report allows to associate discovered agent with appliance but does not provide possibility to specify shared secret (it uses default shared secret).

GIM discovery results
You can notice that my report shows gde1 machine which has the 8445 port opened but does not contain any GIM service. The GIM discovery process uses simple scan technique and identifies only whether the 8445 port is opened or not.
Summary:
GIM in Guardium 10 provides many new features to improve deployment and security.
The shared secret in the listener mode implements SoD and self-generated certificates allows us to identify the GIM agent which do not belong to our administration domain.
Possible improvements in the future:
The shared secret and SSL configuration could enable scenario with strict prevention any unauthenticated communication (communication on port 8444 is not allowed).
The SSL implementation based on this same certificates could be replaced by standard 2-way PKI based on CA

Hi! I can’t find the gim package to upgrade GIM from version 9 to version 10 through GIM. As an instance, with Guardium version 9 there is a guard-gim-v9_GPU_500-73464.gim package, but I can’t find a similar package for version 10. How can I upgrade to version 10 a gim through GIM? Thanks!
LikeLike
Hi,
The WINSTAP and STAP in version 10 are not compliant with 9.5 collector.
Be sure that migration of GIM and other modules is related to appliance version 10.
The GIM 9.5 should be updated using the package described in my article. Does not exist any additional package to upgrade GIM from 9.5 to 10.
Don’t do that on production, check it out earlier on test environment.
LikeLike
Hi! I have tried it in my lab, I have updated from a Guardium 9.5 a WinSTAP from version 9 to version 10 through GIM (version 9) and it worked! Now I have in my Database Server a GIM version 9 and a WinSTAP version 10…
LikeLike
Sorry, and an important observation, it didn’t required to reboot the database server to upgrate it, nor to start the collection of the database activity…
LikeLike
You can also upgrade the GIM client this same way. In the installation archive for GIM exists gim-.gim file. Upload it into GIM and Update your 9.5 version. Finally all your Guardium environment on managed system (GIM, CAS, STAP) will be upgraded to 10.
LikeLike
Hi! The issue here is that I can’t find the *gim-*. gim file to upgrade the gim module through GIM…
Thanks!
LikeLike
I have just checked archives. You probably refers to Windows installation. I confirm that packages for Windows do not include gim upgrade package (this same for CAS – actually available on Fix Pack). I suggest open PMR. For Linux/Unix platforms, the GIM upgrade package is available.
LikeLike
Hello, Great Tutorial. I have tried to POC on Database & File Activity Monitoring from your Videos & website. I did exactly what you explained in Video. But I faced some issue. I have posted the Question in the IBM Community.
https://www.ibm.com/developerworks/community/forums/html/topic?id=5a430ef8-ff31-4955-8a31-9b97c222f0af
I have installed STAP and GIM successfully but Agent is not able to communicate with Collector. I dont know how to open the Port, I tried all possible ways. Please let me know how to contact you.
Thanks
LikeLike
In most cases firewall settings are responsible for this kind of behavior
LikeLike
Hello, Great Tutorial. I have tried the same. But I am facing some issue. I have posted the Question in the IBM Community.
https://www.ibm.com/developerworks/community/forums/html/topic?id=5a430ef8-ff31-4955-8a31-9b97c222f0af
I have installed STAP and GIM successfully but Agent is not able to communicate with Collector. Please let me know how to contact you.
Thanks
LikeLike
zszmigiero@gmail.com
LikeLike