Sensitive data discovery is a key element to create the accurate Data Governance policy. Knowledge about data location (on table and column level), relationship (how the critical data are referred) and movement (change in schema definition) are crucial in the monitoring and access protection.
Guardium provides many enhancements to identify and manage information about sensitive data both within databases, as well as the analysis of files. This article focus on data classification inside databases.
Classification process

Classification process structure
Classification process – manually or periodically executed search job for specific data (classification policy) within defined scope (data source)
Data source – defines access to a database and scope of analyzed schemes
Classification policy – defined set of classification rules with their order and relations
Classification rule – data search pattern based on supported rule type associated with rule actions
Rule action – action invoked when rule has been matched
Classification process discovers sensitive data described by classification policies within data sources and provides output for:
- content of group of sensitive objects used in monitoring policies
- monitoring policy modification
- event notification (policy violation, remote system notification)
- sensitive data reporting
Classification process flow

Analysis flow
- Guardium appliance connects to database (data source) using JDBC driver
- Creates list of tables, views and synonyms
- Gets sample of data from object
- Tries to match any column to defined pattern-rule
- For matched rule executes defined actions
- Repeats 4 and 5 for each rule
- Close connection
- Repeats from 1 for each data source
- Returns results
Classification process setup flows
Guardium 10 provides two scenarios for construction of the classification process:
- from scratch – each element created separately, wider elements can invoke more specialized tasks. Useful for people with good Guardium skills, allows configure all existing classification features (Discover->Classification->Classification Policy Builder, Discover->Classification->Classification Process Builder)
- end-to-end – streamline process facilitates and making easier the classification process creation and its automation. Some features are not available, can be edited later using first scenario (Discover->Classification->Classification Sensitive Data)

Classification menu
Simple Classification Process – from scratch
Task description:
Find all tables and columns names where credit cards numbers are stored inside MS-SQL engine.
My database database Glottery contains table Credit_Cards in glo schema with credit card information stored inside

Table with sensitive data
Process creation:
Go to Classification Process Finder (Discover->Classifications->Classification Process Builder) and add a new process (+ icon)

Add new process
Insert process name in Process Description field and push Modify button

Process definition
it opens pop-up window Classification Policy Finder. Add new policy using + icon

Policy selection
In Classification Policy Definition view insert policy Name, Category and Classification type and save your policy using Apply button

Policy description
it will activate Edit Rules button, select it

Policy description
In Classification Policy Rules view select Add Rule button

Rule list
In rule view insert its name and select from Rule Type list – Search for Data

Rule definition
it will refresh the view and then put in Search Expression field the pattern:
^[0-9]{16}[ ]{0,20}$
which is simple representation of credit card number (16 digits, trailed by maximum 20 spaces). Then save rule using Apply button

Rule definition
we will return to the rule list with new created one
 Close the pop-up window. New created policy is not refreshed in process view that we need to reopen process creation window. Select again Discover->Classifications->Classification Process Builder, put name and select our policy – Find CC in Tables and press Add Datasource button

Policy definition
another pop-up window – Datasource Finder – displays list of existing database definitions. Use + icon to add a new one
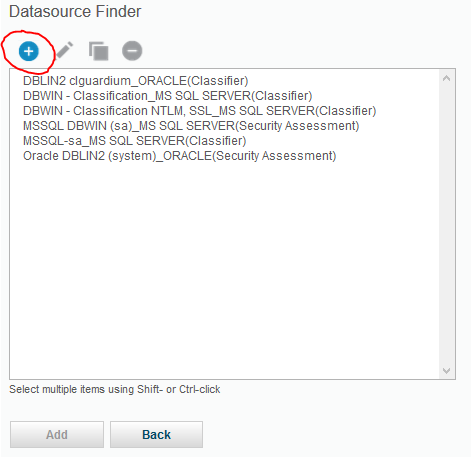
Data source list
Insert Name, from Database Type select appropriate engine, put database account credentials and address IP with port on which database operates. Save definition using Apply button and return to data source list – Back

Data source definition
now a newly created data source is on the list. Select it and Add to process definition

Data source list
Now classification process contains policy and data source. We can save it – Apply button

Classification process
It activates Run Once Now button – process manual execution. Run it

Classification process
We can wait for a while or review status of process execution. Go to Discover->Classifications->Guardium Job Queue. Our job will be on the top of the list

Job list
Refresh report and wait for its completion. Then return to Classification process list, select Find CC process and push View Results button
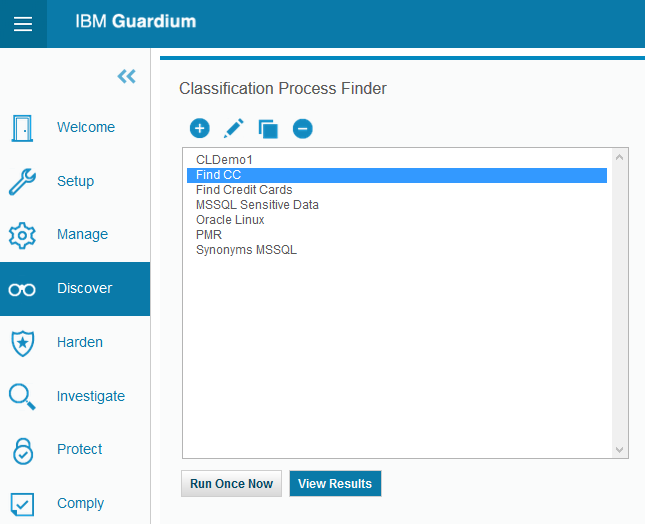
Process list
the pop-up window will contain classification process execution results

Classification process results
Finally our process discovered all tables containing strings that matched simple regular expression. Notice glottery.glo.passwords table in the results which is probably has nothing to do with the credit cards data. The article continues identified various techniques for the elimination of false positive results.
Article continuation:
- Part 2 – Classification rules
- Part 3 – Action rules (soon)
- Part 4 – Classification process and data sources (tbd)
- Part 5 – End to End scenarios and Classification Automation (tbd)

One thought on “Data classification (Part 1) – Overview”